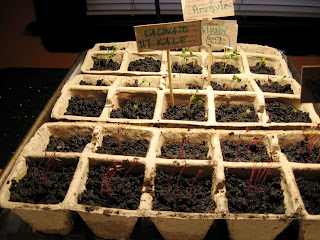
Urban Gardening 101: How to grow seedlings!
We did it y'all. We germinated. I really want to share my newly acquired knowledge because I spent so much time researching different websites and it might be nice for someone in the future to have a nice little synopsis on one blog. My blog. Now, I have no claims to fact or fiction here. I could be doing everything wrong. But this is the route we took, and so far it seems to be working!
It is quite funny because this whole ordeal felt a lot like cooking and baking to me. You'll see why.
Step 1 and 2 Ingredients:
*Seeds, organic and well-vouched for
(arugula, lacinato kale, kohlrabi, hopi red dye amaranth, genovese basil, red rubin basil, cayenne peppers, sweet italian peppers, english thyme, calendula)
*potting soil, sterilized and organic (do not use garden soil)
*seed trays...I used the natural, biodegradable ones that are basically the size of yogurt containers
*bigger trays to hold the little seed pots. you can use baking sheets if you'd like
*water, tepid not cold
*a spoon
*a large mixing bowl
*plastic wrap
*tin foil
*grow lights (cheap plant lights can be bought at home depot!)
*bamboo branch, twine, ceiling hooks (for hanging light apparatus)
*folding table
*electric heater
*skewers and a cut up cereal box (for labeling)
*spray bottle
A note about ingredients! I found a lot of these supplies at Ocean State Job Lot for WICKED cheap.
First, mix together some water and potting soil in a large mixing bowl until the soil is moist but not soaked. Line up your seed trays on the larger trays and spoon the moist potting soil into the cups about 3/4 of the way. Pat down GENTLY.
Sprinkle 2-3 seeds into each little container but not on top of one another. I tried to make little triangles. You know how I've mentioned that I'm a chronic over filler of food things? Well I could not help myself and did the exact same thing with seeds! I may have accidentally put 4 seeds in some of the cups, so we'll see what comes of that.
Label each row immediately! Sprinkle some more soil over each container to very lightly cover the seeds. For some seeds, they might just need to germinate on the surface in which case do not cover. Most seeds need to be covered from 1/8-1/2 an inch. Pour some water in larger trays so the soil can be watered from the bottom. This will help draw the roots down.
Turn your heater onto 75F and place under a folding table. Wrap the trays in plastic and put them on the table. My table is in front of bay windows so the sunlight during the day provides some warmth as well. But the seeds need to be in 70-90 degree temperature. The plastic wrap, water and electric heater basically have a greenhouse effect and create a nice and moist environment for germination.
Wait.
When the seeds have germinated, immediately remove the plastic wrap and have your lights ready to go. Not all seeds will germinate simultaneously so do this in stages. Take another cookie sheet and line it in tin foil. Place the seed tray on the tin foil with some water under direct light for 18 hours. Then for 6 hours, turn the light off. The natural daylight lamps are really warm so they will dry out the soil. Make sure to replace the water in the tray and spray the tops as well. I'm going to do this for a week or so and then switch to normal daylight/nighttime hours. Any suggestions about light cycles for seedlings??
My lighting apparatus is SUPER simple, thanks to a couple of handy man roommates. Although i could have figured this out I suppose, it helps to have a tall person and another guy who is really good at hanging stuff. :-)
Tie some twine to a pole of some sort. We used a bamboo stick that we took out of our backyard grove. Secure the other ends of twine to 2 small hooks in the ceiling. Adjust length. Clamp lights onto bamboo. Turn on! So easy! See?
This is so exciting to me! I'm brimming over with joy and nervousness. I hope I don't mess this up...If you notice that I'm doing something wrong, please please please let me know. I'd really appreciate it.
Next real step is cleaning up the yard and getting the soil tested! Will update soon! Ta ta!


jennifer, i want to start a little garden here... do you know anything about it or have any advice? thanks! - anna
ReplyDeletewell yes i know a very small amount and would be very happy to bounce ideas around with you. let' talk soon.
ReplyDelete